Hi everyone, Sebastian here from Twisted! This is the first in a series of painting articles I'm going to write for Twisted, showing some of the methods I use for painting as well as revealing a few tips and tricks.
Don't forget to enter the Twisted Painting Competition by Feb 4 to get your 10% discount!
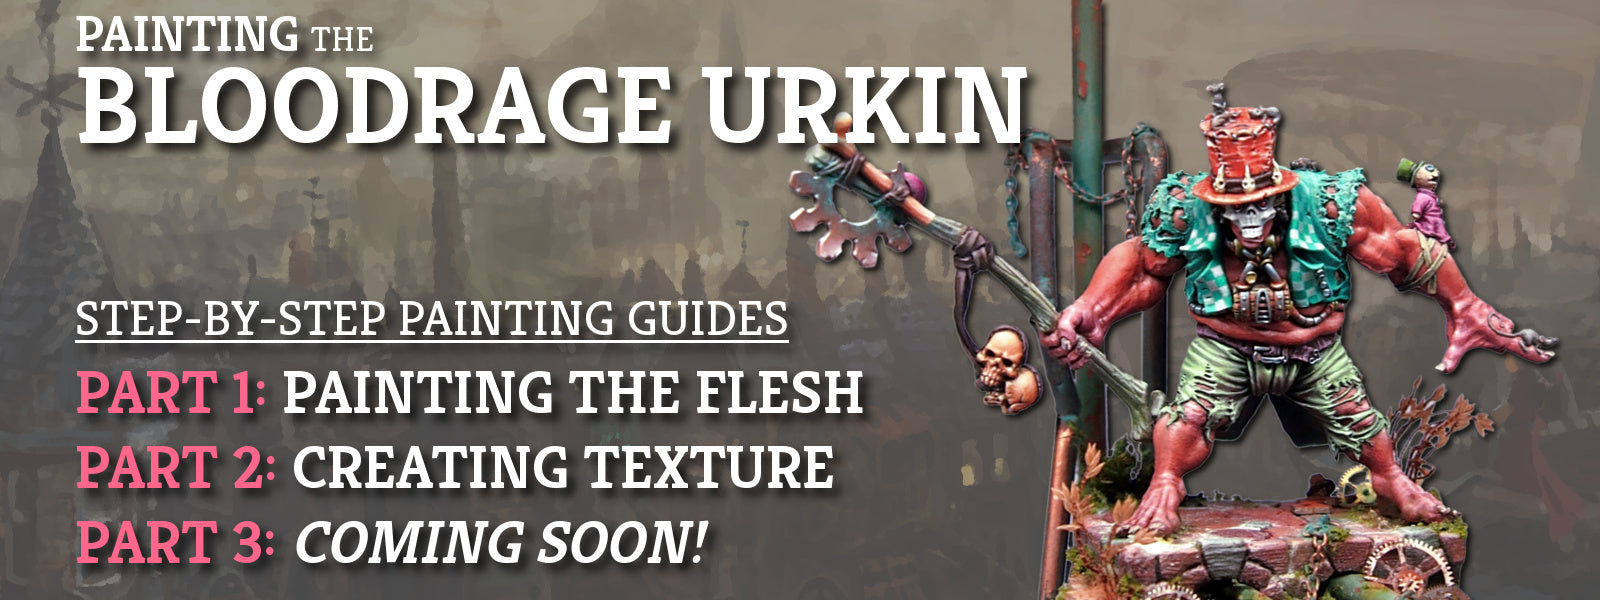
The miniature I will be painting is the Bloodrage Urkin, from the Dickensians Faction. The Bloodrage Urkin is a violent, aggressive creature infused with the power of the Engine – he has been transformed from the spindly Urkin Alchemancer into a muscle-bulging monstrosity!
With this in mind, I wanted the flesh colour to be quite bold and colourful. I decided quite a strong reddish hue might give a sense of this aggressive action and violent temperament. A creature of dynamic action!
In Part 2 I look at Creating Texture:

Buy the Bloodrage Urkin (and his smaller alter ego the Urkin Alchemancer) here: Online Store

After undercoating the miniature in mid-grey, the flesh was given a basecoat of a ruddy flesh colour. In this case the paint I used was P3 Khardic Flesh. It is quite a rich flesh colour, a middling tone – not too light - with a red-orange aspect which suited the aggressive feeling I wanted to work towards.
The paint was thinned approx 1:1 with water, and the basecoat was painted in 2 or 3 thin layers over the surface being careful not to let the paint pool in any of the cracks or recesses. This is important, because if the paint pools it will dry with an uneven finish. In the Step 1 palette photo you can see a stripe of the paint on the paper to the right where I have wiped off the brush, showing the paint consistency.
The objective of the base coat is not to make a completely opaque (solid) layer of colour over the surface. If the paint layer is too thick, it creates a slick, slippery surface which makes applying the next stages more difficult.
Rather, the aim is to lay down 'starting point' of thin, even colour – it can even be semi-translucent. We aren't painting the wall of a house, so don't feel like it needs to completely cover the undercoat in a solid layer! It's fine if the 'tint' of undercoat colour still partly shows through, and in fact it is better to preserve that fine grain texture created by undercoat spray which gives the paint something to 'grip' when applied.


Now it's time to get down to business, and start building up the highlights and shadow tones in the flesh!
In the Step 2 palette photo you can see I have added 2 highlight colours to the palette, and 2 shading colours. (The basecoat colour remains in the centre). All the new colours are thinned with water to a ration of approx 3:1 water:paint.
The highlight colours were created by mixing the basecoat (P3 Khador Flesh) with a bright cream colour (P3 Menoth White Highlight). The lighter highlight colour has more of the Menoth White Highlight added. The shading colours consist of a terracotta colour (P3 Bootstrap Brown with a touch of red) and a dark purple-brown (P3 Battlefield Brown mixed with P3 Sanguine Base).
I prepared all these colours together on the palette because I like to use them all at the same time, swapping back and forth between highlights and shadows as I work. I find this approach helps me concentrate on creating the overall 'global' feeling of the shading and highlighting. It's much more flexible than getting bogged down in a linear style process of using just one tone at a time, before moving on to the next one. It's also faster to work with all the tones together on the palette.
Technique: All the different tones were applied in the same way. Thin layers of dilute, translucent paint to slowly build up the colour with successive passes. Think of it as applying filters of colour over parts of the surface: more filters with the darker colours over the shadowed areas, more layers of the light colours in the part you want to highlight.
It's fun painting this way because you can't really make a mistake: the colour very slowly builds up with multiple layers, so you don't need to be precise, you can move the brush quite quickly with freedom. The trick is to use very little paint on your brush – wipe it off on paper before moving to the miniature – so that each paint layer is super thin and will dry almost immediately, and not pool or run into the cracks.


For step 3 I repeated the processes from step 2, reinforcing the highlights and shadows even further to exaggerate the effect. I especially concentrated on deepening the shadows in this stage, adding an extra darker purple-brown colour to the palette.
Don't worry if the paint work or blends start to get a bit rough, as things will be smoothed out in the next stages. Right now it's more important achieve some good depth and contrast in the flesh, with strongly defined dark shadows and light highlight areas. Exaggerate the contrast more than you think – the more contrast between light and dark, the better!


This is the secret weapon! I find this technique a very useful tool - so I'll spend a bit of extra time explaining the process here!
After all the back-and-forth working with the lighter and darker flesh tones, the painted surface can start to look a but chalky and uneven. In order to smooth out the transitions and blend things together, I like to apply some glazes of the original basecoat colour (in this case, P3 Khador Flesh) over the entire flesh area.
Thin glazes of a mid-tone over the whole surface act as a kind of 'clouded filter' which smooths out the appearance of the painting work underneath, and brings everything together. It almost gives the surface a 'blurred' smooth effect.
Technique: Applying a glaze over the whole flesh surface is very easy and simple to do, but there is a bit of a trick to it. The most important thing is to use as little paint as possible! You need to use just enough to barely wet the surface, and quickly paint over the whole surface of the flesh. Each layer should be dry within 20 seconds or so. This is important because it prevents the paint from pooling in cracks or drying unevenly. The objective is to create even 'filter' layers of neutral colour over the whole surface.
The paint needs to be very dilute – it should look like 'coloured water' on the palette and be thin enough that it barely shows up (if at all) after a layer is painted over the figure. We are trying to apply a series of super thin filters over the surface – maybe 6 or more layers – and it's this gradual tinting of the surface that gives the 'blurred smooth' effect.
Even though you might paint 6+ layers, it's a fairly fast process because each layer is so thin that it dries in about 30 seconds. So it only takes a few minutes to do the whole process.
Just keep applying layers until you're satisfied with the result!


This is the fun part!
All the steps so far have lead to a bit of a dull and neutral looking result for the flesh. But I wanted something bold and punchy to suit the Bloodrage Urkin's temperament, so now it's time to bring back some of that vibrancy and colour.
To fit with the colour scheme and atmosphere I had in mind, I used some strong red and purple hues. Looking at the palette photo, I have a bright pink-purple (P3 Sanguine Highlight), a darker purple-red (P3 Sanguine Base) and a red orange (a mix of P3 Bloodstone with pure red). I also mixed some turquoise as a counterpoint to fit with the rest of the colour scheme, for a little hint here and there, but did not end up using it much.
These saturated colours were applied in very dilute layers (similar in technique to the glaze in Step 4) but were only applied selectively to certain areas – NOT the whole surface. For example, looking at the photos, you can see I concentrated the pinkish colours more around his hands and elbows, and used the red-orange colour more in the 'meat' of his muscles. Varying the hue through the flesh like this can make the surface more interesting and bring more attention to certain areas.


To finish the flesh, the most important thing was to bring back some of the intense highlights which were becoming lost after all the previous glaze layers. These final highlights really make the flesh 'pop' and glow.
In the palette photo you can see I have 5 colour mixed: they're similar colours to those used in Step 2, but the brightest highlight is pure P3 Menoth White Highlight. The painting focus was on the highlights, building that intense brightness. The shading colours on the palette were only used to neaten the odd area or deepen a shadow here and there as I finalised things.
The highlight colours were applied following the same process as Step 2, but being careful to only address the very 'top' brightest spot areas of the flesh. I wanted to preserve the vibrant colour of the flesh from the previous step, so I did not want to cover too much of the surface. This means I used a more delicate touch than Step 2.
You'll notice that brightest 'light points' are quite small. You don't need to over-do the lightest highlights – in fact, it's more effective if you keep them small as they then give a greater impact against the mid-tones of the flesh, and really help make it seem glowing and alive.


So there you have it – that is the basic method I used to paint the flesh for the Bloodrage Urkin, and I use a similar process for much of my painting. Hope you've enjoyed this little glimpse.
Buy the Bloodrage Urkin (and his smaller alter ego the Urkin Alchemancer) here: Online Store
If you've got any questions about this article or want to discuss it, I have created a dedicated topic on the Twisted Official Forum. I'm very happy to answer questions or discuss any aspect of these articles:
In the upcoming articles we are going to take a look at the painting process for other aspects of the Bloodrage Urkin, such as creating textured effects, painting freehand checks, and constructing the scenic display base!

